
How to Automatically Extract Email Data to Google Sheets

To automatically extract email data into Google Sheets with Suparse, forward matching messages to a Suparse intake address, choose whether to process the email body, attachments, or both, and configure a Sheets destination for that document type. The destination creates a new spreadsheet in your connected Google account, and eligible results are sent after extraction, validation, or reviewer finalization, depending on the gate you choose. See the email-to-Google-Sheets workflow for the available intake options.
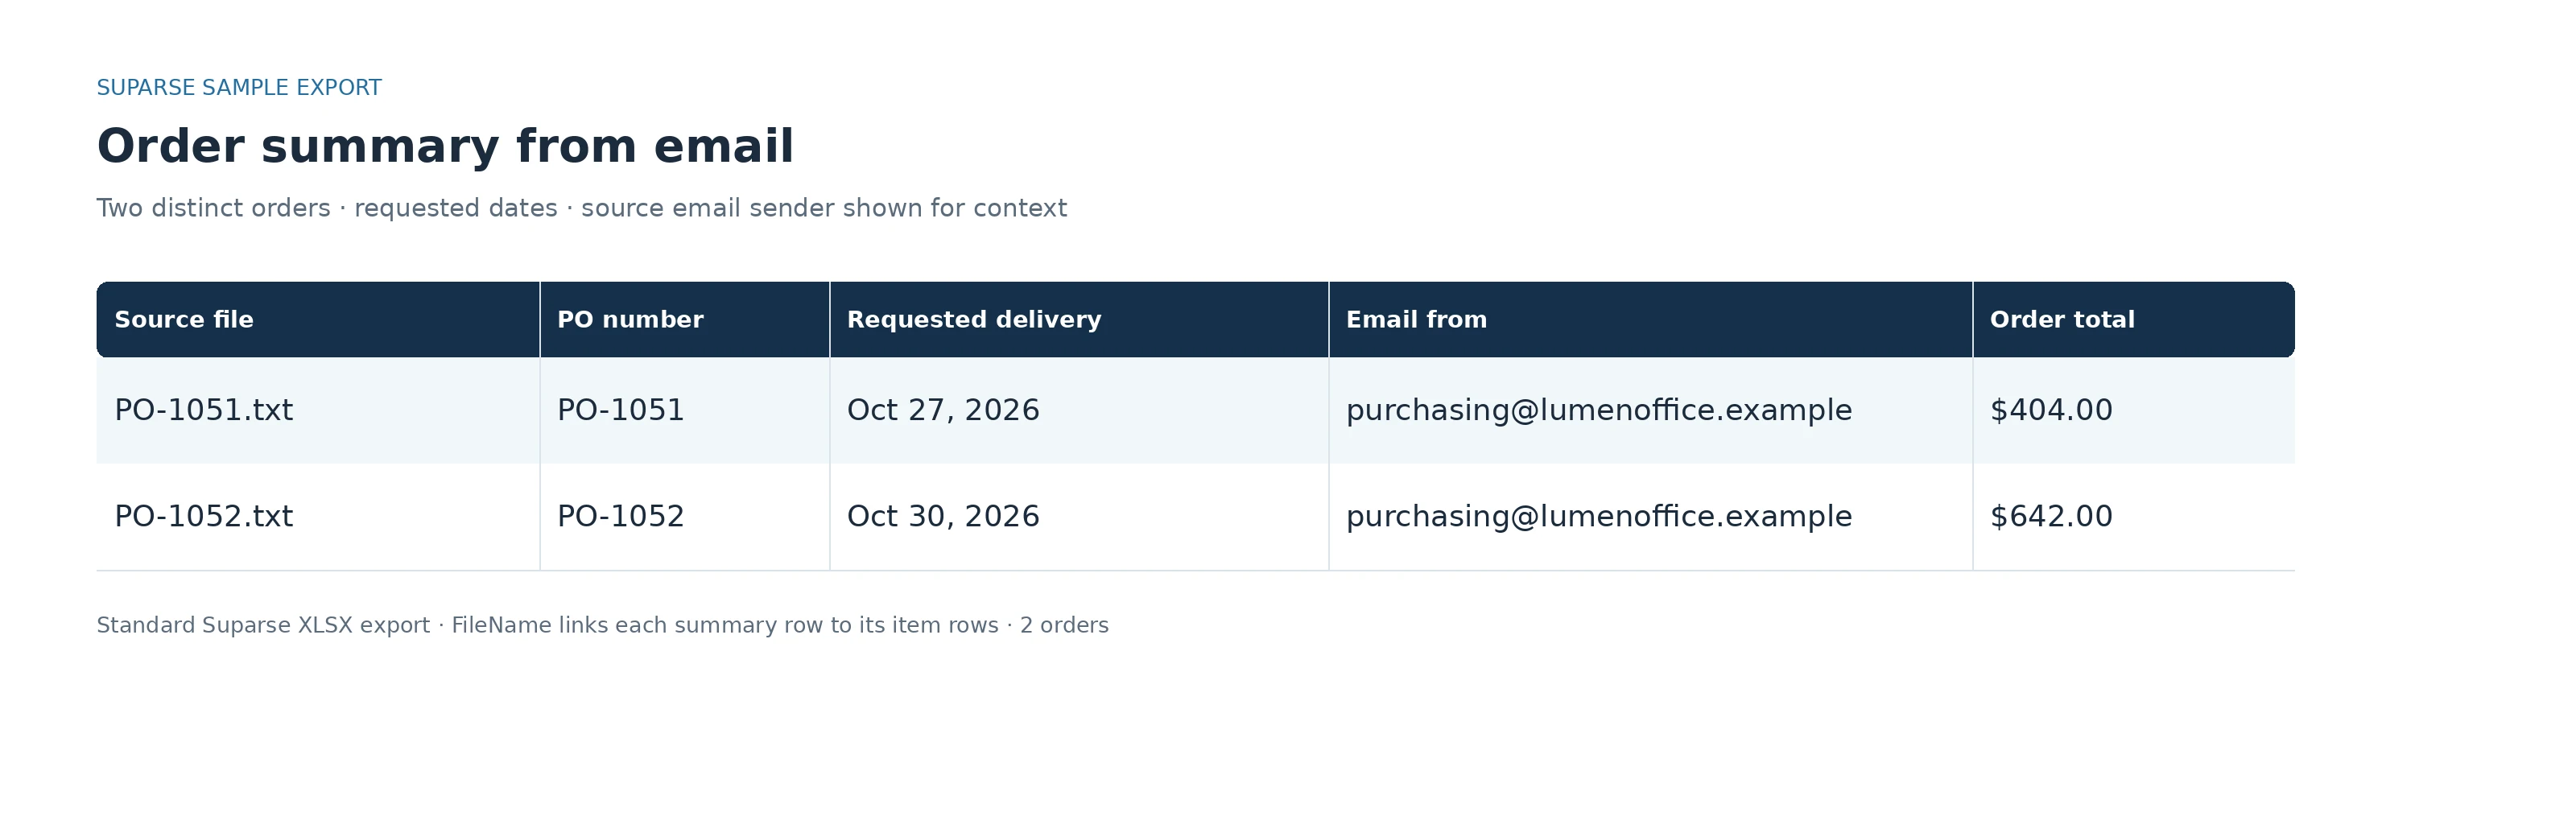
Two email orders summarized with requested delivery dates and email sender context.
| Source file in the workbook | Purchase order | Requested delivery | Email sender context | Order total |
|---|---|---|---|---|
Purchase order PO-1051.txt | PO-1051 | 2026-10-27 | purchasing@lumenoffice.example | $404.00 |
Purchase order PO-1052.txt | PO-1052 | 2026-10-30 | purchasing@lumenoffice.example | $642.00 |
Each order has two item rows. The sample contains four item rows and 20 units; the summary totals add up to $404 + $642 = $1,046. In the workbook, FileName connects each summary row to its item rows. The PO number is the buyer's business reference, while the filename identifies the processed source. The summary image adds sender context from Suparse email metadata; that sender value is not a column in the native XLSX file.
The PO-1051 email body, PO-1052 email body, and native XLSX sample let you compare the source text with the output. The workbook contains Summary_list, Items_list, and Validation tabs.
If your team handles recurring purchase orders, set up an email-to-Sheets workflow and test it with one representative message.
Key Takeaways
- Forward messages to Suparse; it does not import or search your mailbox history.
- Choose body, attachments, or both based on where the record lives. Body and attachment processing can create separate results.
- Configure one new spreadsheet per document type, then choose the row layout and when a result is eligible for delivery.
- Use the shared document reference to connect an order summary with its line items in Sheets, and check the first delivered rows before relying on the register.
Before you start: choose what the email should contribute
Set up or select a document type for the records you want to track. A purchase-order type might capture its number, dates, buyer, currency, and total, plus item SKUs, descriptions, quantities, unit prices, and line totals.
Then select which part of each forwarded message contains the record:
| Email source | Use it when | What to expect |
|---|---|---|
| Body only | The request or order is written in the message text | The body is processed; attachments are left out. |
| Attachments only | The body says “see attached” and the attached document contains the fields | Supported attachments are processed as documents. |
| Body and attachments | Both contain records your team needs | The body and each attachment are separate inputs and can produce separate results; their contents are not merged into one record. |
The example uses body-only processing for a Purchase Order Email type. If you only need attachment extraction, choose that source instead of creating duplicate results from both parts of the email.
1. Forward matching messages to the Suparse address
Open the email intake settings for the document type and use its displayed intake address in your mail provider's forwarding rule. Forward a new test message, then check that Suparse received it and created a result under the intended type.
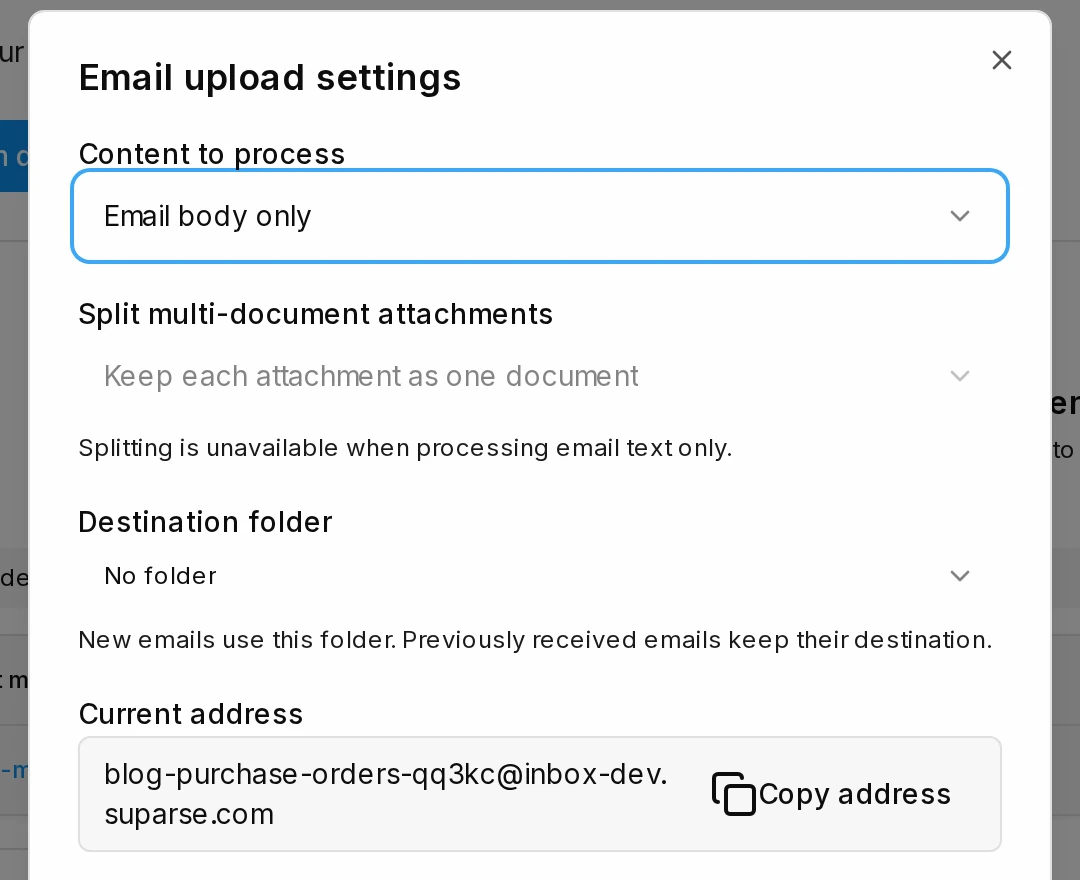
Choose email body processing for the Purchase Order Email type.
Confirm that the extracted PO number, dates, totals, and item fields match the message. Email-originated results also carry sender, subject, and received time so a spreadsheet row can be traced to its message. In the local example, the sender address is purchasing@lumenoffice.example.
2. Connect Google and configure the destination
In the automatic Sheets export setup, connect the Google account that should own the spreadsheet, choose the document type and email as the source, name the new spreadsheet, and preview its columns. Choose Email only if direct uploads and API submissions should stay out of this register; that source setting is separate from the body-or-attachment choice in email intake. Setup creates the spreadsheet in the connected account's Drive. The automatic Google Sheets export settings explain destination choices and delivery gates.
Choose how document fields and table rows should appear:
| Layout | Tabs | How to read the rows |
|---|---|---|
| Separate | Suparse Documents and Suparse Items | One summary row per order; each line item gets its own row. The document reference connects them. |
| Combined | Suparse Data | Document fields repeat beside each item; a document without items still gets a row. |
For the example, the destination is named Purchase Orders, uses email-only results and separate tabs, and is set to add results after extraction.
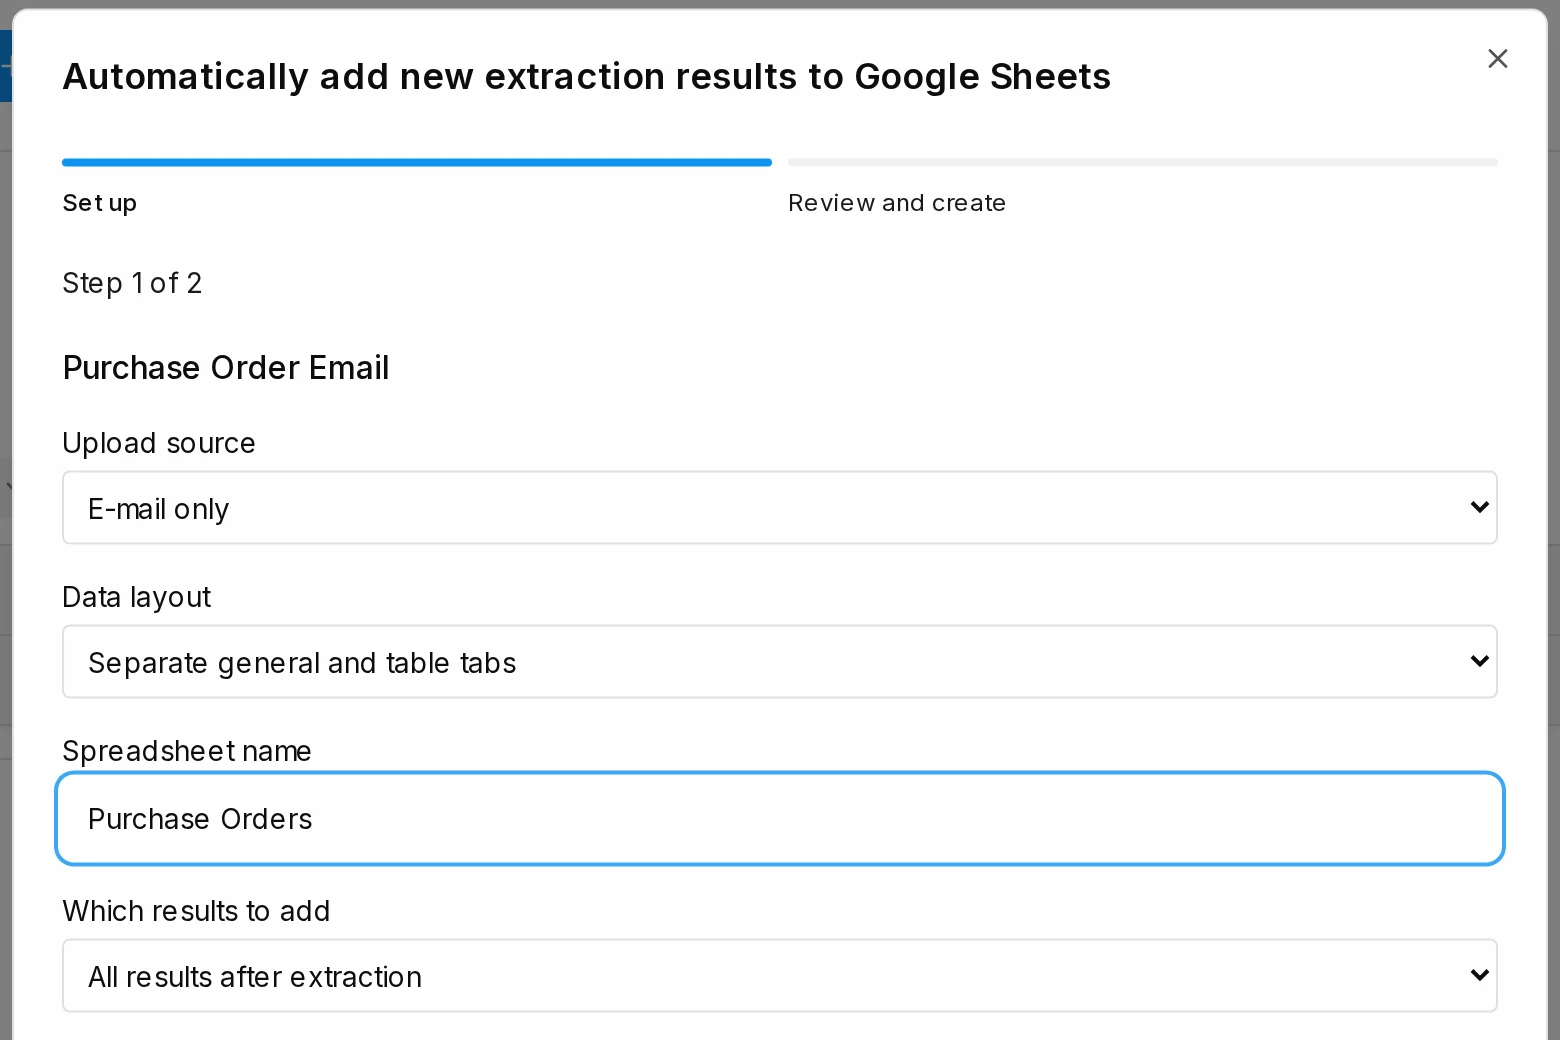
The unsaved setup form shows email as the source, separate summary and item tabs, a Purchase Orders spreadsheet name, and the after-extraction gate.
Pick the gate that matches your team's process:
- After extraction sends a result when extraction finishes.
- After validation waits until configured checks pass. A pass means those rules passed, not that a person approved the result.
- After reviewer finalization waits for a teammate to inspect and finalize the result.
Review the columns and gate before creating the spreadsheet.
3. Process another email and inspect the rows
Forward a second distinct email, then check its source context, extracted summary fields, and item rows. The sample PO-1052 requests delivery on October 30, 2026 and has two item lines.
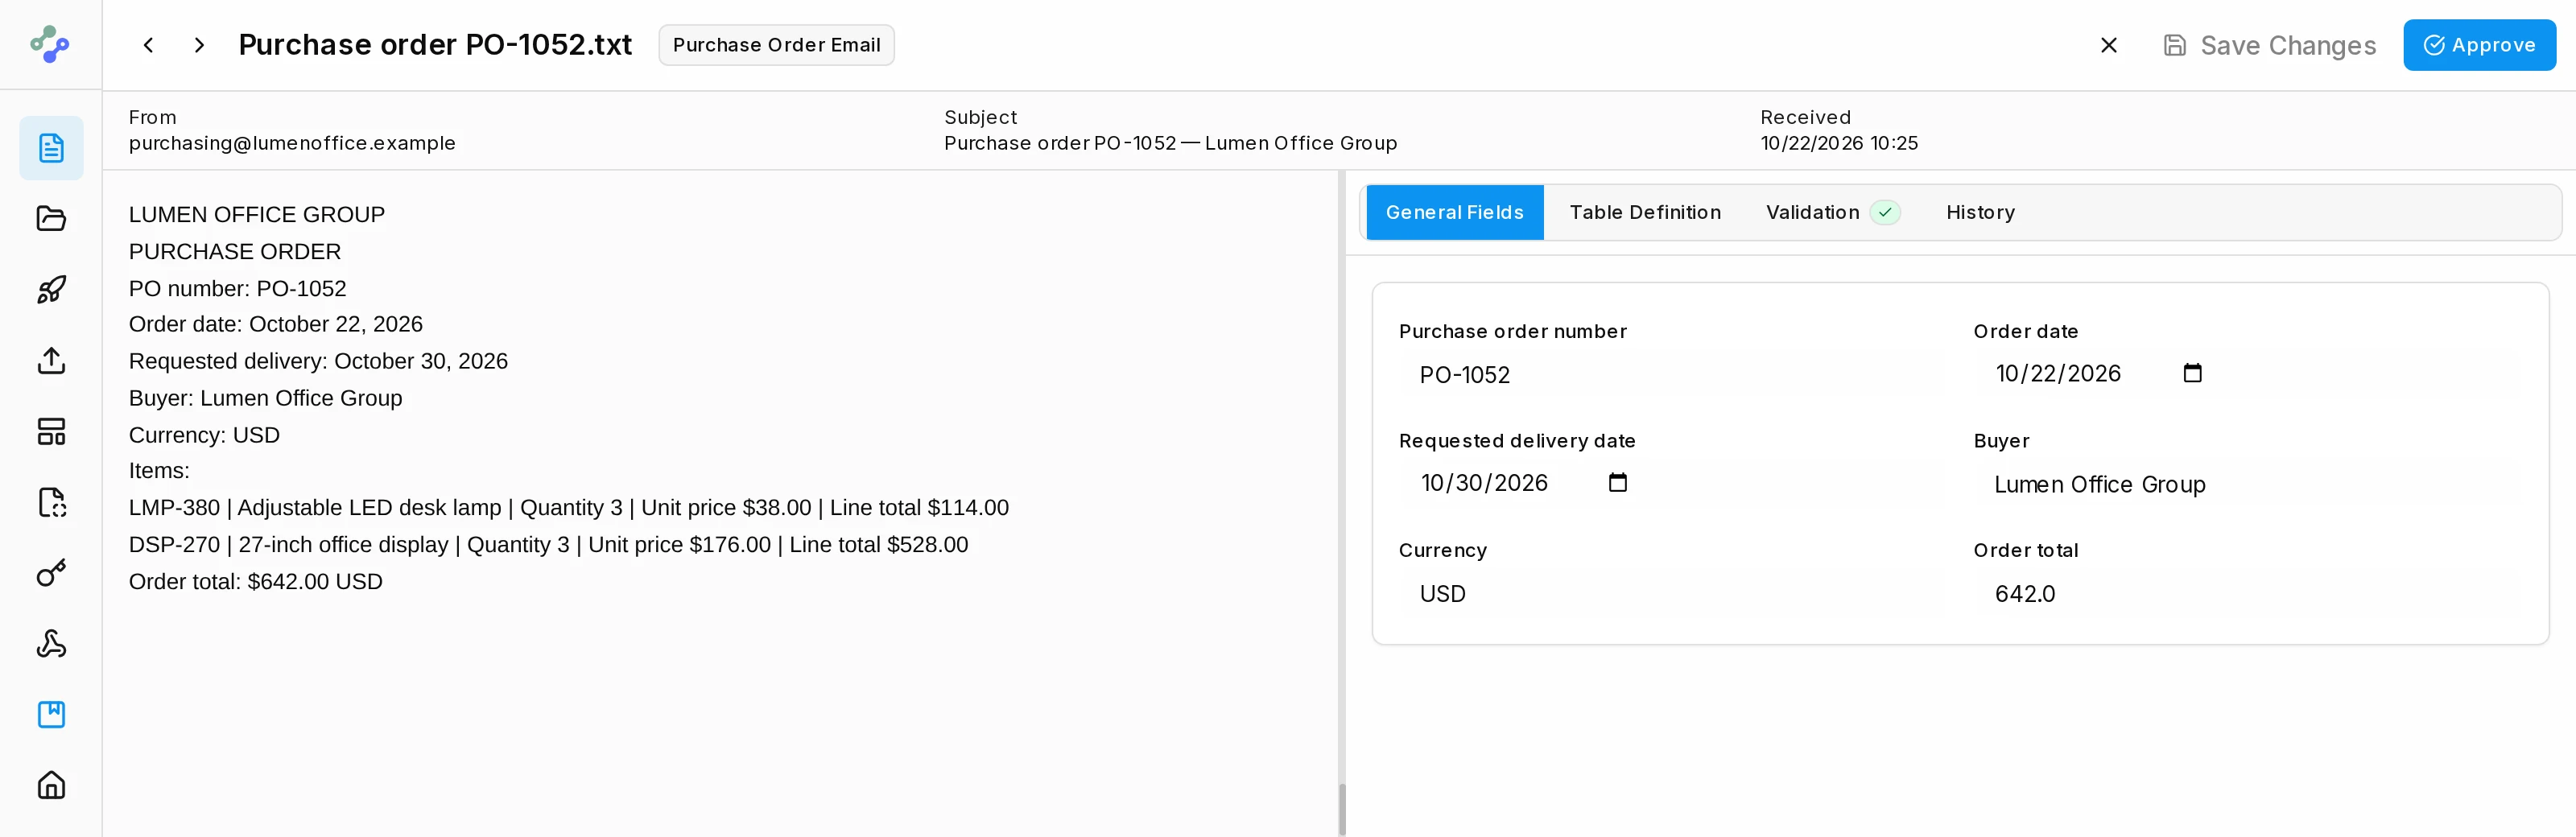
The later PO-1052 sample beside its requested delivery date and extracted fields.
The item rows make the relationship concrete:
| Purchase order | SKU | Item | Quantity |
|---|---|---|---|
| PO-1051 | GLV-410 | Nitrile work gloves, box of 100 | 10 |
| PO-1051 | HAT-220 | Industrial safety helmet | 4 |
| PO-1052 | LMP-380 | Adjustable LED desk lamp | 3 |
| PO-1052 | DSP-270 | 27-inch office display | 3 |
The sample XLSX stores each source filename on both tabs. In Google Sheets, use the document reference to connect the summary and item rows; filenames and email context help you recognize the source.
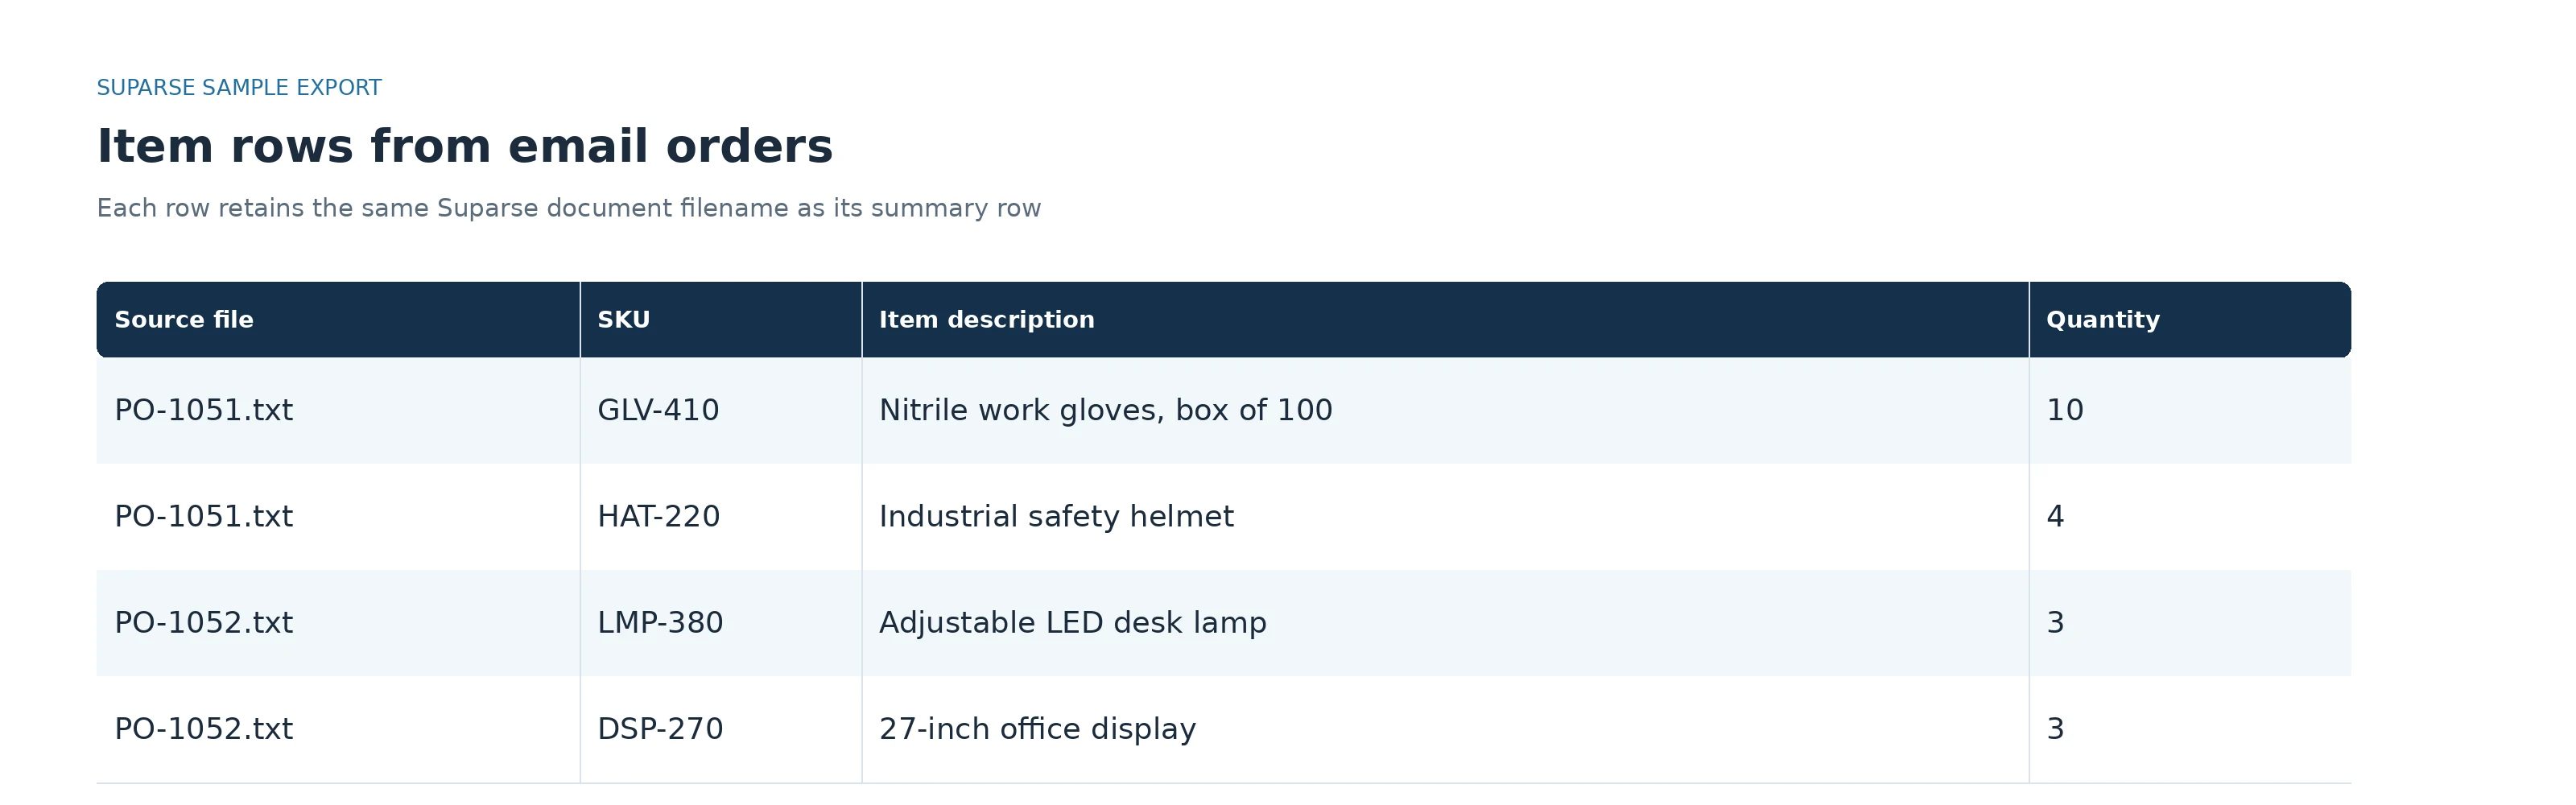
Four item rows connected to their summary rows by the Suparse document filename.
Need a downloadable report instead of a shared destination? Follow how to extract order emails into Excel. For scanned tables in PDF attachments, use the scanned-PDF-to-Google-Sheets walkthrough.
What happens when data changes later?
Treat a delivered row as a snapshot: edits or reprocessing in Suparse do not update it. For a held result with no delivery plan, select the latest saved values before sending. To add earlier Suparse results, preview a received-date range and add eligible records without rerunning extraction; this does not import mailbox history, and already-delivered results are skipped.
Troubleshoot a row that is missing
Check these points in order:
- Receipt: Did the forwarded message reach the Suparse intake address?
- Extraction: Does the intended document type show a completed result with the fields you expect?
- Destination scope: Does the Sheets destination include this document type and email as a source?
- Delivery gate: Is the result waiting for validation or reviewer finalization, rather than set to send after extraction?
- Delivery status: Check the result's status. For stored-results backfill, the preview distinguishes ready, waiting, and already delivered records.
Start with one test email to catch a wrong source, missing field, or unsuitable gate before forwarding more.
Frequently asked questions
Can Suparse add rows to a Google Sheet I already use?
No. Setup creates a new spreadsheet in the connected Google account. Add analysis in separate tabs and leave the managed data tabs and delivery log intact.
Why is a result still waiting to reach Sheets?
Check whether it has passed the selected validation or reviewer-finalization gate. Only then is it eligible for delivery under that setting.
Does validation mean a person approved the order?
No. Validation means configured rules passed. Choose reviewer finalization if a person must inspect values before delivery.
What if the email body and attachment describe the same order?
Processing both can create separate results: the body and each attachment are separate inputs, not merged. Choose one source when the order should produce a single result.
If you are comparing ways to put scanned documents into a shared spreadsheet, see the scan-to-Google-Sheets converter comparison.
Want to track recurring email orders without retyping them? Set up your email-to-Sheets workflow.
Set up an email-to-Sheets workflow
Choose the email content, fields, and delivery point that fit your team's purchase-order process.
Create your Suparse accountMichal Raczy
Michal is the founder of Suparse.com. He has over 15 years of experience in delivering projects in data analysis, automation, and document processing. Michal solves complex automation and AI implementation challenges for both SMEs and large corporations, with a particular focus on document processing. Contact at michal@suparse.com.